In case you are interested in making cool time lapse videos with your Creality Ender 5 or Ender 5 Pro, you are at the right place. Just to give an example of what I mean by amazing, see the short video clip below:
HOW IT WORKS
After printing each layer the printer is programmed through G-Code (e.g. using post-processing script for time-lapse in CURA ) to go to the origin position where it presses a push button that triggers a Camera to take a photo. In this way, when the picture is taken, the print head is out of the camera view. The Camera keeps taking pictures of every printed layer, and when combined the final results looks as if the 3D print grows on itself. See this process in action in the following video:
MORE ABOUT THE MODIFICATION
The 3D printable modification to Ender 5 / 5 Pro is easy to print and can be used with any DSLR or other compact camera that uses a 2.5 mm audio jack to trigger the shutter button for taking photos. The modifications in this article have been tested on an Ender 5 Pro with a Canon 600D.
If you have decided to give it a shot, then you need the following things:
2.5 mm audio jack cable
Glue Gun
Loctite Super Glue
Push Button
Camera with 2.5 mm audio jack input for shutter control
3D printable modifications to Ender 5: https://www.thingiverse.com/thing:4819623

In case you don't have number 5, then you can also program a Raspberry PI to get input from the push button and take photos with Raspberry PI camera or another external camera that can be controlled through the Raspberry PI.
The 3D printable modifications, for making time-lapses, to Ender 5 / 5 Pro can be downloaded from the following link:
The following three parts need to be 3D printed:

The above parts can be printed without supports with 40% infill. Part (A) needs to be screwed on the extruder as shown below:

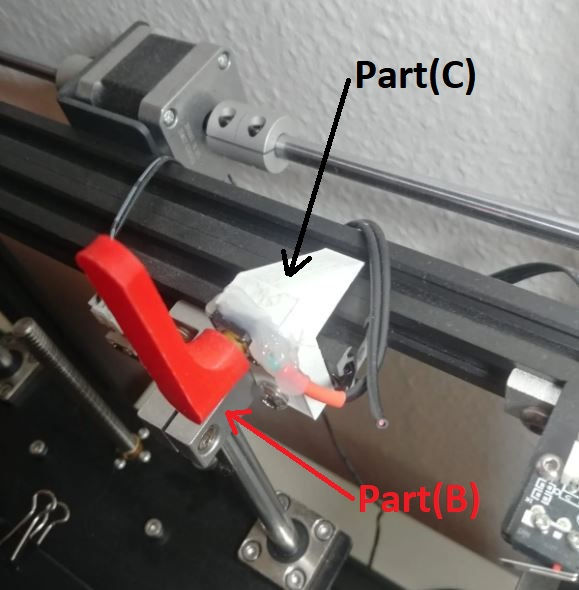
Part (B) needs to replace the cap of the push button. It is recommended to super-glue (e.g. with Loctite) it to the push button so it does not fall off. Once the push button has been modified with Part (B) then that push button needs to be hot glued to Part (C) as shown below:
One end of the 2.5 mm audio jack needs to be inserted in the DSLR camera (Canon 600D) and the other end needs to be attached to the push button terminals. So that when the button is pressed the camera shutter would be triggered. It is recommended to keep the camera in manual focus mode while making time-lapses.
Once the above setup has been completed, the next step is to setup a post-processing plugin in CURA. These settings would move the print head/ extruder at the origin location to press the push button after printing each layer. In this way the camera would take a picture after each layer when the print head is out of the view of the camera.
To enable these settings go to Post Processing plugins and add the Time Lapse script as shown below:

Once Time Lapse script has been added, please use the settings shown below as they have been tested to work best with the Ender 5.

Now your Ender 5 is all setup and ready to make jaw dropping time lapses. Just slice your model, upload it to your printer and keep calm!
Comments